

Exposure blending with GIMP
In this tutorial I will show you how to manually create a exposure blend using the Gimp. I will be utilizing three photos of a lamp. The photos where taken on a tripod to prevent ghosting due to misalignment. The cameras exposure bracketing was set to take three images one at normal exposure and the other two were overexposed and underexposed by two stops. You Can see those three photos in the image below. The image on the right after the = is the resulting image after blending the three images on the right together. I have made the three photographs of the Lamp available so you can use them to follow this tutorial if you wish.
Get lamp images as zip file
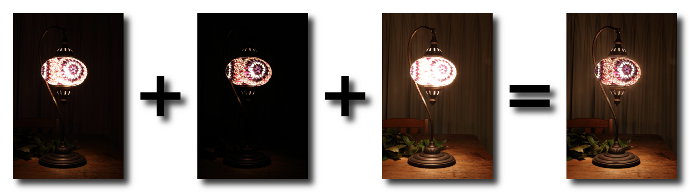
| Normal exposure | Underexposure | Overexposure | Exposure-blend |
|---|
What is a exposure blend?
Exposure Blending is the combining or blending together of photos differently exposed Photos or images. In the above Images you can see that the lamp with the normal exposure is clipped in the bright lit area and everything else is to dark. On the overexposed image the background is lit perfectly but the lamp itself is seriously blown out and has no remaining details. The underexposed Image shows a lot of detail in the lit area of the lamp but everything else is lost in darkness. When a scene has a lot of contrast with very bright and very dark areas cameras are simply not able to take a photograph with all areas lit correctly. But a great image can be created by blending The bright areas of the Underexposed image and the dark areas of the overexposed image on top of the normal exposed Image. This will Create a final Image where everything is lit perfectly. Nothing is lost in darkness and nothing is blown out or clipped.
Preparing photos for exposure blending
You are welcome to use the Three lamp images I have provided above to follow this tutorial and create your first exposure blend in Gimp. But even if you choose to start off with the provided lamp photos You will want to take your own Photos so you can create your own exposure blends with your own Images. After all that is the point of it. There are several methods of preparing multiple photos. Exposure blends can be made from as little as two images to as many as five or even more. In this tutorial I will be using three Images but the method is the same regardless of how many images are being used. More is not always better and the law of diminishing returns definitely plies here.
Exposure bracketing
This is the best method of taking photos for exposure blending. It involves taking three photos of the same scene. One of the three photos being overexposed and one being underexposed. The camera should be on a tripod for best results. Otherwise you will need to align and crop the images In GIMP or Photoshop afterward, which in some cases could also lead to parallax issues
Creating over and under exposed images from RAW files
This is the next best method of preparing Photos for exposure blending. If your camera shoots raw images you can open them in a RAW image editor UFRaw is a good one if you don't already have one. In the RAW image editor create a Overexposed version and a underexposed version of the photo and export each as a separate file.
Pseudo exposure blend
This method is the least desirable as its quality will not be as good as with the other methods. Don't let it put you of in some cases you might still get a fantastic image. Simply open your Image in a editor such as GIMP then create two duplicates of your image and use the brightness, curve of levels tools to brighten one Image and darken the other image.
How to create a exposure blend in GIMP
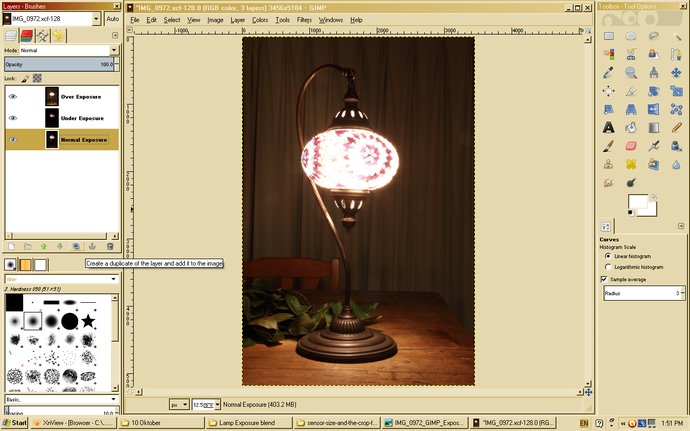
This is now the actual tutorial step by step tutorial where we are going to create a exposure blend from the tree lamp images. First open the GIMP. Then click on File and then choose Open. Navigate to the area where your Image is located on your computer select the image which is normally exposed and open it.
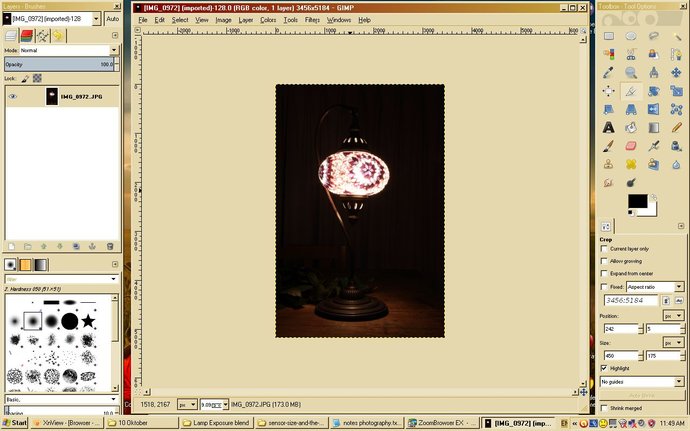
Screen-shot of base image opened in gimp
Now to open the underexposed image as a layer click on File and then Open as Layer. Navigate to the Underexposed image and open it. Then repeat this step. And open the overexposed Image as a layer in the same fshion.
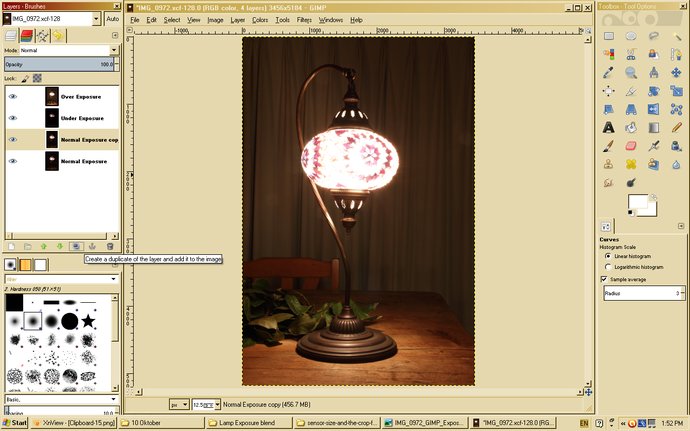
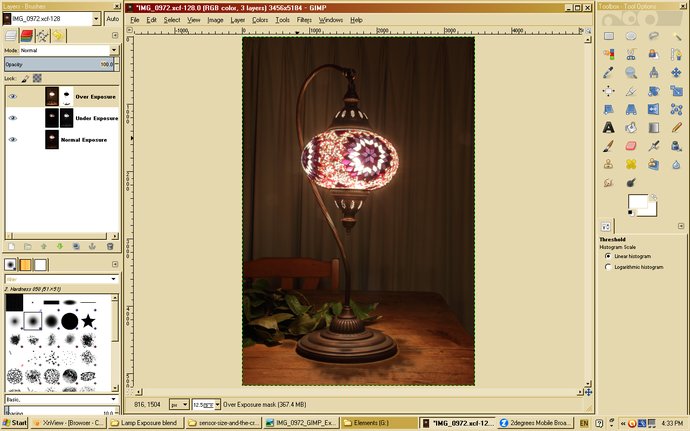
All Images, normal exposure overexposure and underexposure are opened as individual layers. Each layer is visible on the layer panel on the left. You can click on the little eye Icon on the left of each layer in order to turn the layers visibility on and off. Go ahead and try that out if you are unfamiliar with this feature.
Now in the layers and Brushes panel select the middle exposed image layer by clicking on it. Then click on the create a duplication button to make a copy of the layer.
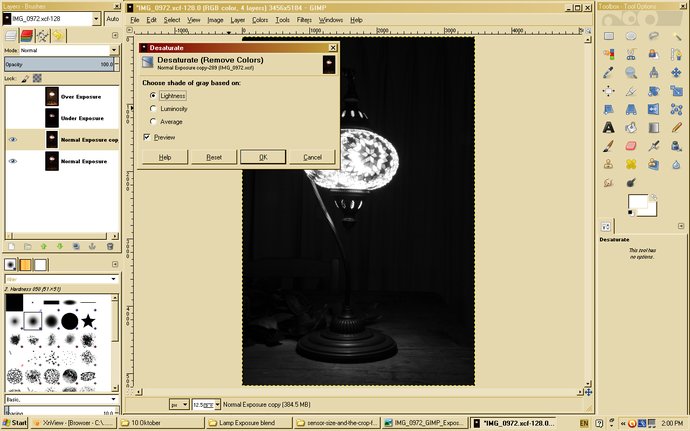
Click on the eye on the layers above the duplicate you have just created so you can see the duplicate without being obscuring by the above layers. With the duplicated layer selected go tho the Colors tab and select Desaturate. The desaturated box will open asking you to chose shades of gray based on lightness, luminosity or average. They all look slightly different but which one you choose is not to critical for our purposes. Just check one and press OK. Before you move on select the gray scale layer and duplicate it so you have two gray scale layers.
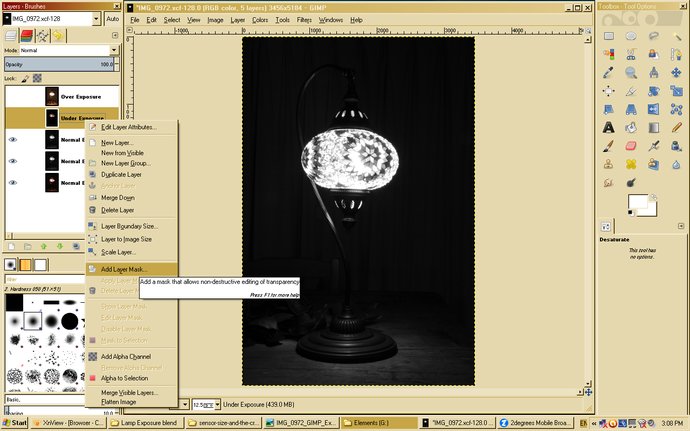
Select the underexposed layer and right click it. Select "Add Layer Mask" from the drop down menu. A box will open asking "Initialize Layer Mask to". Just leave it at default as we will manually set the layer mask.
Right click on the underexposed layer and make sure There is a tick next to "Edit Layer Mask". What this means is that any editing you do in that layer is applied to the layer mask and not the layer itself. This is something to take note of when working with layer masks.
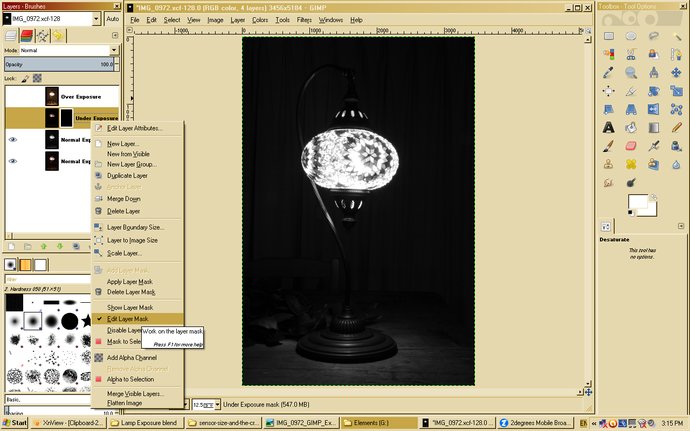
Now select one of the grayscale layers that we created just a moment ago. We are now going to set it as the layer mask for the underexposed layer. In order to do this go to Edit and select Cut.
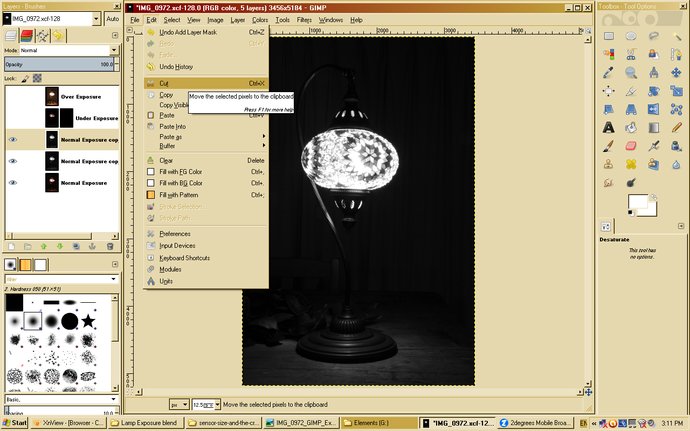
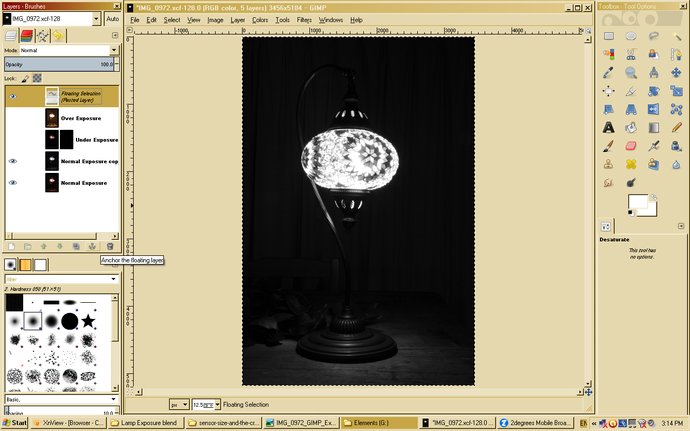
Now select the underexposed layer. Go to Edit and select Paste. The greyscale layer will now appear as a floating layer. Click on the Anchor icon to anchor the floating layer.
Now we will do the exact same procedure with the second greyscale copy we created earlier to make it the layer mask for the overexposed layer, First add a layer mask to the overexposed layer. Then cut the grayscale layer. Select the overexposed layer and paste the grayscale layer. Then anchor the layer. Again make sure "Edit Layer Mask" is ticked during this procedure.
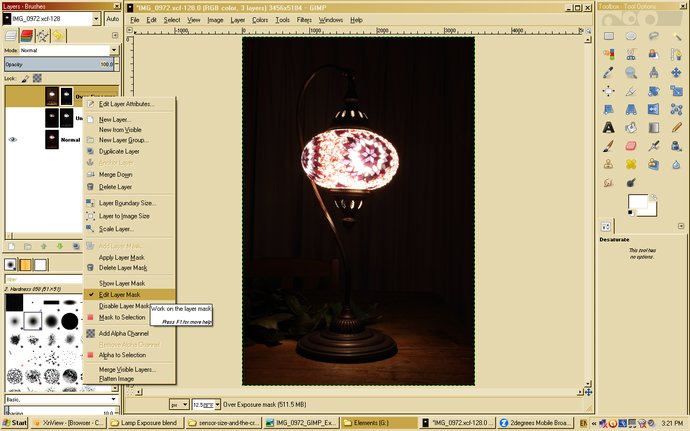
Because we want this layer mask to mask out the brightest areas which are to bright we need to invert it. The way to do this is to go to Colors and then select Invert. You can also click on the eye on the left of the overexposed and underexposed layers to make them visible again. This way you can see the effects the layer masks are having on the Image.
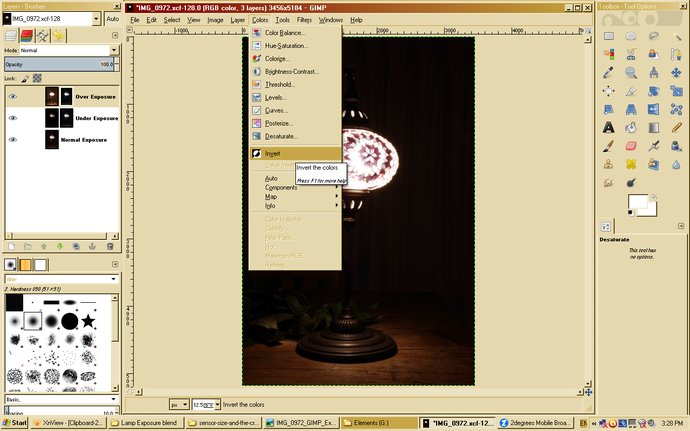
Withthe layer mask is inverted you can see how it Hides the bright area of the lamp which was blown out in the overexposed layer while the darker ares such as the background remain.
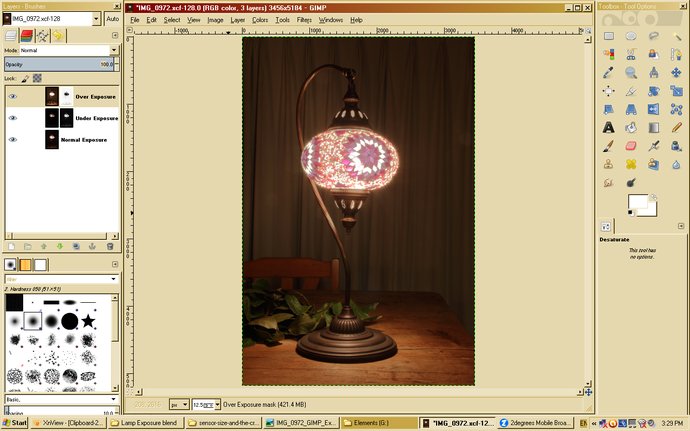
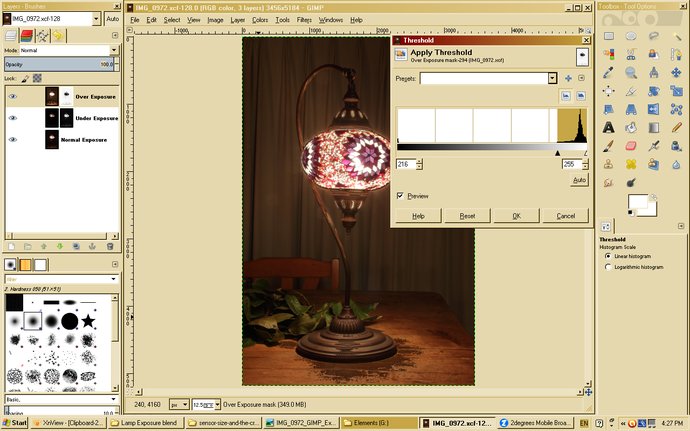
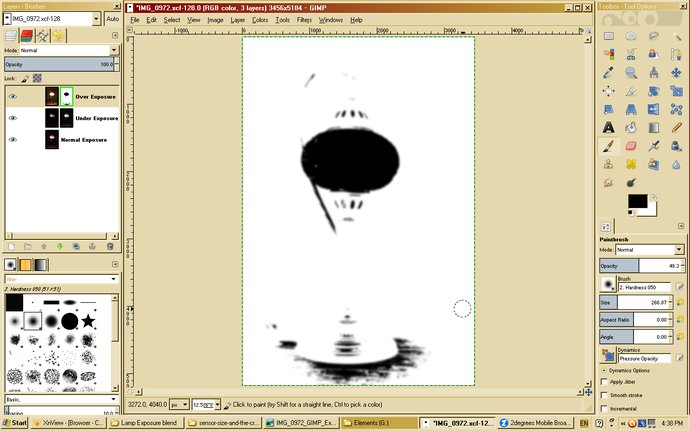
You will probably have noticed even dough there are no blowouts or blackouts the image just does not look right yet. We are now going to dramatically improve this image by manipulating the layer-masks. First select the overexposed layer. Click Colors and then select Threshold.

With the threshold box open move the slider to improve the look of the lamps lit area. right click on the overexposed layer and select "Show Layer Mask" To see what effect the threshold is having on the layer mask. The bright area of the lamp should be black while almost everything else should be white when looking at the layer-mask. Click OK when you are happy with your settings.
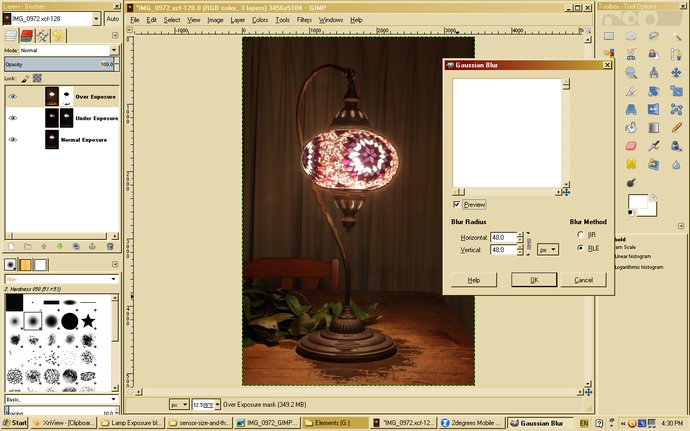
Now we need to get rid of the sharp undesirable edges that this mask has created. The way to do this is to apply a blur to the layer mask softening the edges. Go to Filters, Blur, Gaussian Blur. The Images I'm working on are 18 megapixels or 5184 pixels tall. I have set the blur radius in the Gaussian blur panel to 48 pixels. Anything from 40px to 60px would look fine in my case. You need to Increase the blur radius for larger images and decrease it for smaller images accordingly. If you have downloaded the lamp images they will be 2000 pixels tall which would require a blur radius of around 20px.
The light colored glass of the lamp now looks much nicer but you will notice some unwanted darkening on the table just by the base of the lamp. I have chosen to use a threshold due to the extreme contrast of the lamp head and the rest of the image. But this has had a somewhat undesirable effect on the table.
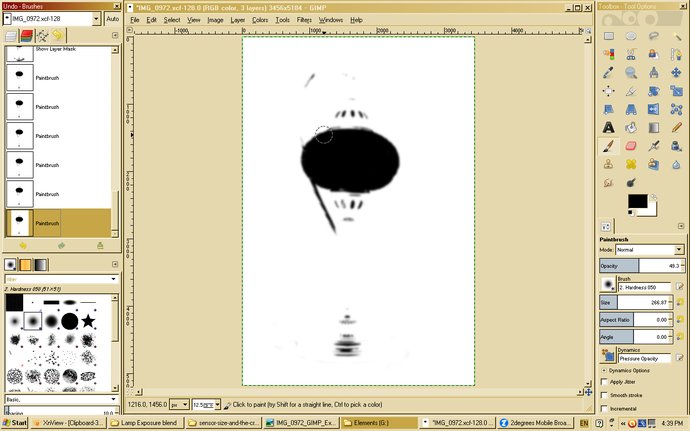
Now to remove the darkening around the base of the lamp right click on the overexposed layer and select "Show Layer Mask" Then select the brush tool and set the brushtools foreground color to white. Then use the brush and paint the black area on the table at the base of the lamp white.
This is what the layer mask should look like when you are done painting the table white. The white color will now mask the dark background from showing trough on the table.
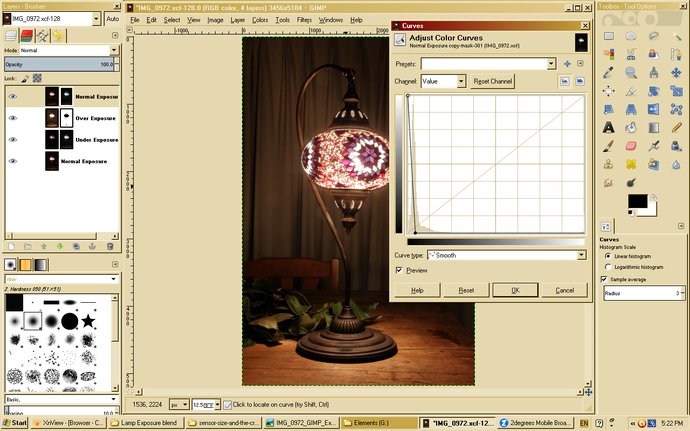
In the case of this image I found no manipulation to the underexposed layer mask was necessary. But We will put a bit more contrast in to the image background. To do this Select the normal exposed layer and make a Copy of the layer. Raise the copied layer all the way to the top using the up arrow underneath the layers panel. With each click of the arrow the layer will move one level so you need to click the arrow several times to move the layer all the way to the top. Right click the layer and "Add Layer Mask". In the "Add Layer Mask" Panel select "Grayscale copy of layer" and press Add. Now to manipulate this layer mask go to colors and select Curves. Then Adjust the Color curve by moving the Left side up and the right side down which will invert the dark and bright areas of the mask. Make further adjustments as in the image below and press OK when done. This will enable the mask to only allow some of the shadowy areas of the layer such as the wrinkles in the curtains to show trough to add a bit of contrast over the top of what we already have. If you find the effect to strong You can reduce the layers opacity by moving the opacity slider to the left
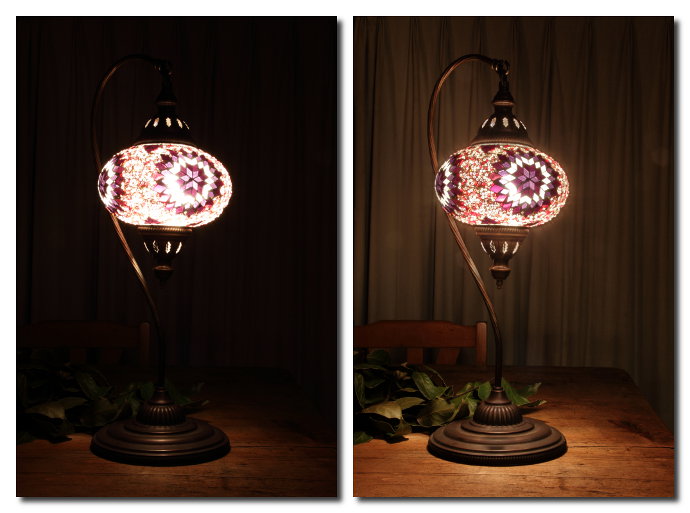
And finally on the left we have the original Image at normal exposure and on the right we have our final exposure blend. Which looks nicely lit throughout, and perhaps a little bit surreal. A exposure blend can be made to look very realistic or totally fantasy like. It all depends on how you chose to manipulate the layers and their layer masks.
This tutorial is of course only the beginning and there are countless ways that you can adjust your layers and layer masks. It all depends on what you are trying to achieve and what type of scene you are working on. Manual exposure blending is not always easy and some images definitely lend themselves better than others. You should now have some knowledge of how exposure blending works and be able to do some experimenting.
